推送 SDK(iOS)
推送 SDK 最低兼容 iOS 8.0 系统。
GrowingTouchCoreKit.framework 触达基础依赖库 GrowingTouchCoreUI.bundle UI 页面图 GrowingPushKit.framework 触达推送库 GrowingCDPPushExtensionKit.framework 图片推送和 iOS 10 以上统计后台通知的到达率
集成 SDK
集成 GrowingIO iOS CDP 数据采集 SDK
推送 SDK 依赖于数据数据采集 SDK
版本要求最低 1.2.3,如已集成请跳过
参考 iOS SDK
添加支持用户运营扫码的代码
在 AppDelegate 中添加
因为您代码的复杂程度以及 iOS SDK 的版本差异,有时候 [Growing handleUrl:url] 并没有被调用。请在各个平台上调试这段代码,确保当 App 被 URL scheme 唤醒之后,该函数能被调用到。
-  (BOOL)application:(UIApplication  *)application openURL:(NSURL  *)url sourceApplication:(NSString  *)sourceApplication annotation:(id)annotation

{

 // 如果没有触发handleUrl 扫码弹窗 和扫码注册推送不生效

 if  ([Growing handleUrl:url])  // 请务必确保该函数被调用

 {

 return  YES;

 }

 return  NO;

}
集成用户运营 SDK
GrowingPushKit 和 GrowingCDPPushExtensionKit 都需要集成 ! GrowingPushKit 和 GrowingCDPPushExtensionKit 都需要集成 !! GrowingPushKit 和 GrowingCDPPushExtensionKit 都需要集成 !!!且不同 target
下载地址http://assets.giocdn.com/cdp/ios/CDPTouch1.4.7.zip
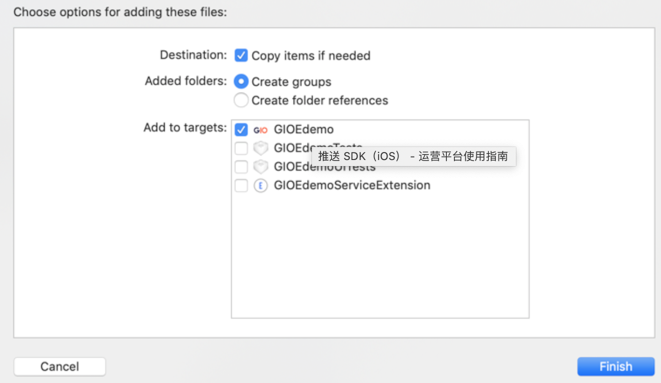
- 下载最新的 iOS GrowingTouch SDK 包,并将其中的 GrowingTouchCoreKit.framework、GrowingTouchCoreUI.bundle 以及 GrowingPushKit.framework 添加到 iOS 工程中
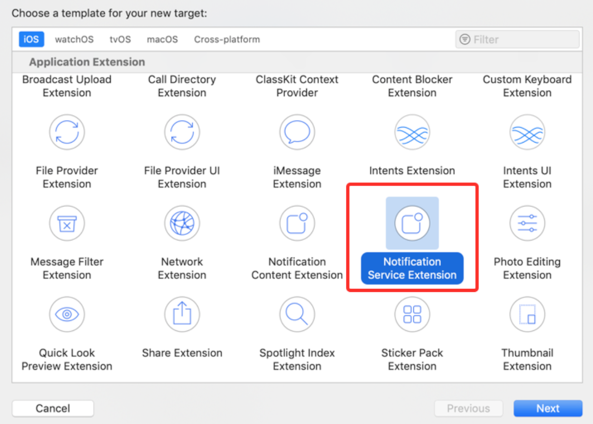
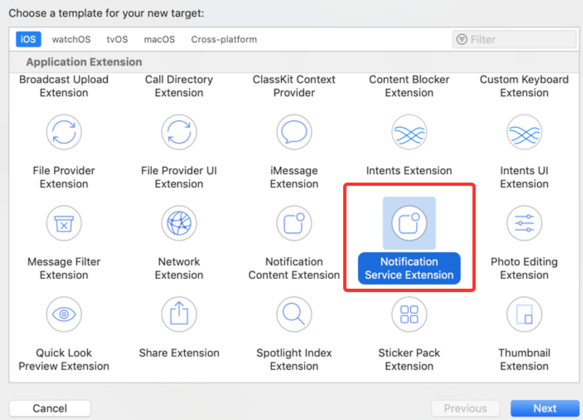
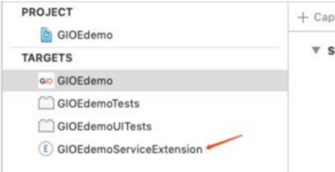
- 添加扩展 Notification Service Extension ,在 File -> New -> Target 中选择箭头所指,即可建立扩展 GIOEdemoServiceExtension,
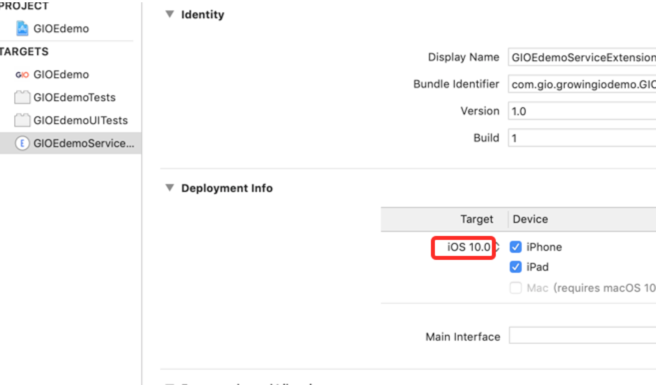
- 请将 Notification Service Extension 中的 Deployment Target 设置为 10.0。
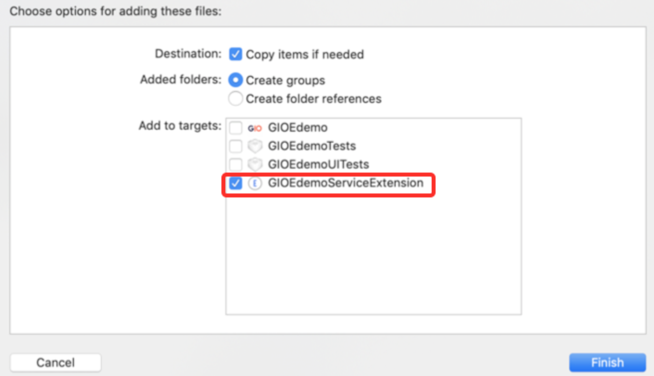
- 将其中的GrowingCDPPushExtensionKit.framework包将之添到扩展Notification Service Extension
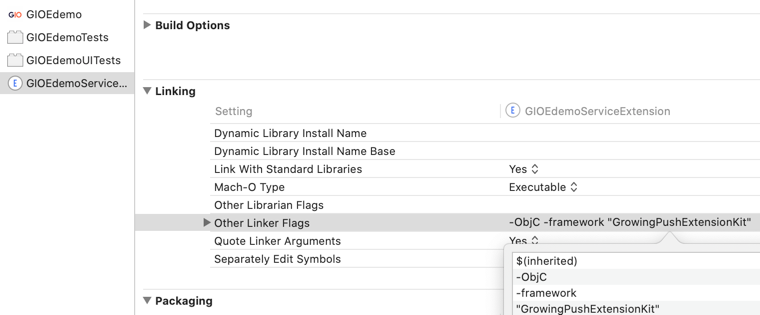
- 确保扩展 GrowingCDPPushExtensionKit 引入成功,other link flags 选项有添加
$(inherited)和-ObjC添加编译参数,并注意大小写:
请保证扩展的 target 最低版本 iOS10.0
编写集成代码 重要配置
AppDelegate 写入 推送设备的 deviceToken 上传
用户自行实现通知注册请求授权后,在 AppDelegate 的 deviceToken 代理方法中调用 API,传入获取到的 deviceToken,请确保能获取 deviceToken,否则无法接收通知消息。 #import <UserNotifications/UserNotifications.h>
#import <UserNotifications/UserNotifications.h>
- (void)application:(UIApplication *)application didRegisterForRemoteNotificationsWithDeviceToken:(NSData *)deviceToken {
[GrowingTouch registerDeviceToken:deviceToken];
}
通知注册请求授权码可参考如下:
-  (void)registerRemoteNotification {

 if  (@available(iOS 10,*))  {

 UNUserNotificationCenter *center =  [UNUserNotificationCenter currentNotificationCenter];

 center.delegate =  self;

 [center requestAuthorizationWithOptions:(UNAuthorizationOptionAlert | UNAuthorizationOptionSound )

 completionHandler:^(BOOL granted, NSError * _Nullable error)  {

 if  (granted)  {

 dispatch_async(dispatch\_get\_main_queue(),  ^{

 [[UIApplication sharedApplication] registerForRemoteNotifications];

 });

 }

 }];

 }  else  if  ([[UIApplication sharedApplication] respondsToSelector:@selector(registerUserNotificationSettings:)])  {

 UIUserNotificationType type = UIUserNotificationTypeAlert | UIUserNotificationTypeBadge | UIUserNotificationTypeSound;

 UIUserNotificationSettings *settings =  [UIUserNotificationSettings settingsForTypes:type

categories:nil];

 [[UIApplication sharedApplication] registerUserNotificationSettings:settings];

 [[UIApplication sharedApplication] registerForRemoteNotifications];

 }

}
扩展中写入,Notification Service Extension扩展的后台通知回执接口调用 handleNotificationRequest: withCompletion:
在 iOS10 提供的扩展 Notification Extension Service 中通知接收方法中调用通知消息回执接口,代码示例如下:(注意不是写在 AppDelegate 中,是写在你新建的扩展里面)
还要设置一下 AccountID dataSourceID Trackhost
#import <GrowingCDPPushExtensionKit/GrowingPushExtensionKit.h>
- (void)didReceiveNotificationRequest:(UNNotificationRequest *)request withContentHandler:(void (^)(UNNotificationContent * _Nonnull))contentHandler {
self.contentHandler = contentHandler;
self.bestAttemptContent = [request.content mutableCopy];
// 设置AccountID 和 dataSourceID
[GrowingPushExtensionKit startWithAccountId:@"AccountId" dataSourceId:@"datasourceID "];
// 设置Trackhost,埋点上报地址
[GrowingPushExtensionKit setTrackerHost:@"your track host"];
[GrowingPushExtensionKit handleNotificationRequest:request
withCompletion:^(NSArray<UNNotificationAttachment *> * _Nullable attachments, NSArray<NSError *> * _Nullable errors) {
// Modify the notification content here...
self.bestAttemptContent.attachments = attachments; // 设置附件
self.contentHandler(self.bestAttemptContent);
}];
}
推送消息自定义协议的处理 clickMessageWithCompletionHandler:
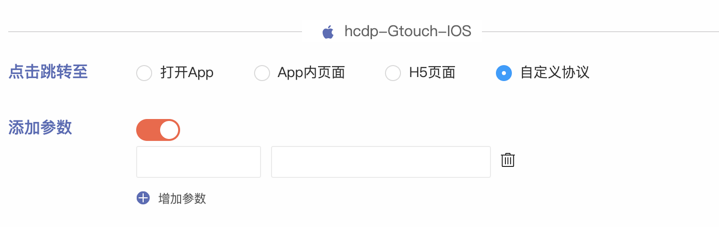
推送功能默认提供打开 APP、打开网页、打开 APP 内部页面三种功能,如果该三种功能还是满足不了您的需求,您可以在 SDK 提供的以下方法回调中自定义自己的跳转逻辑。
//  点击消息跳转用户自定义

+  (void)clickMessageWithCompletionHandler:(void  (^)(NSDictionary *params))completionHandler;
注意事项
由于 iOS 的远程推送通知在各个版本上有一定的改动,为了统计数据更加准确,需要针对不同的系统分别做相应的处理
iOS 10 以下的系统
针对 Remote Notifications 系统提供了以下 2 个通知接收方法,如果您的应用支持 iOS 10 以下的系统,请至少实现如下 2 个方法中的任意一个,建议实现方法 2
// 1、早期的方法,iOS 10 以后废弃,依然可以使用
- (void)application:(UIApplication *)application didReceiveRemoteNotification:(NSDictionary *)userInfo NS\_DEPRECATED\_IOS(3_0, 10_0);
// 2、上述方法的替代方法
- (void)application:(UIApplication *)application didReceiveRemoteNotification:(NSDictionary *)userInfo fetchCompletionHandler:(void (^)(UIBackgroundFetchResult result))completionHandler NS\_AVAILABLE\_IOS(7_0);
iOS 10 及以上系统
对于 iOS 10 及以上的系统,请通过 UNUserNotificationCenter 请求通知授权并设置代理,并同时实现如下 2 个通知代理接收方法
-  (void)userNotificationCenter:(UNUserNotificationCenter *)center willPresentNotification:(UNNotification *)notification withCompletionHandler:(void  (^)(UNNotificationPresentationOptions options))completionHandler;

-  (void)userNotificationCenter:(UNUserNotificationCenter *)center didReceiveNotificationResponse:(UNNotificationResponse *)response withCompletionHandler:(void(^)(void))completionHandler ;
如何在当前项目中添加 Notification Service Extension
针对 iOS 10.0 以上的系统,为了能支持图片推送和统计后台通知的到达率,可添加 Notification Service Extension 类型的 target ,调用指定的 API,具体参见“重要配置”中的第 2 条,在当前项目中添加 Notification Service Extension 步骤如下:
在 File -> New -> Target 中选择箭头所指,即可建立
常见问题
推送跳转 App 原生界面
特别需要注意以下两点:
(1)如果点击跳转的原生界面是通过 Objective-C 开发的控制器,例如控制器名称为 InAppViewController ,传递参数为 key1、key2,则推送 Web 页面配置如下:
- 推送 Web 页面配置如下:
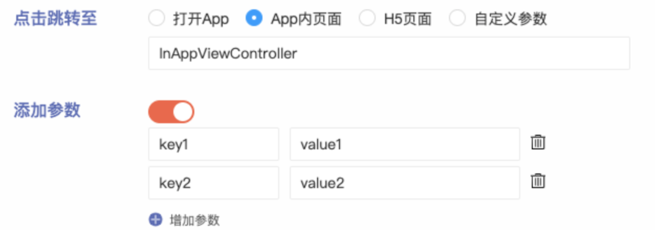
此时生成的跳转链接为InAppViewController?key1=value1&key2=value2 ,点击自动跳转到原生界面 InAppViewController,并携带两个参数。
在 InAppViewController 可以通过提前定义属性,获取参数
@interface InAppViewController : UIViewController

@property  (nonatomic, copy) NSString *key1;

@property  (nonatomic, copy) NSString *key2;

@end
(2)如果跳转的原生界面是通过 swift 开发的控制器,需要按照以下步骤进行接入。
例如跳转的原生界面是 SFViewController.swift,示例项目工程为 TestDemo,在 SFViewController.swift 中可以通过提前定义属性,用于获取参数
class  SFViewController:  UIViewController  {

 @objc  var key1:  String?

 @objc  var key2:  String?

 override  func  viewDidLoad()  {

 super.viewDidLoad()

 // Do any additional setup after loading the view.

 }

}
第 1 步:编译运行当前示例项目工程 TestDemo(实际过程中应为对应的项目工程名称)
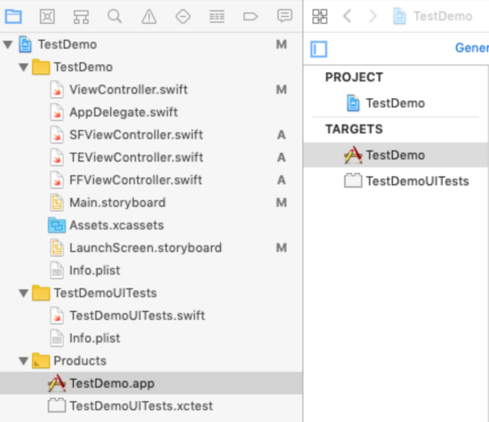
第 2 步:运行成功之后,在 Products 文件夹下,选中 TestDemo.app 后 Show in Finder
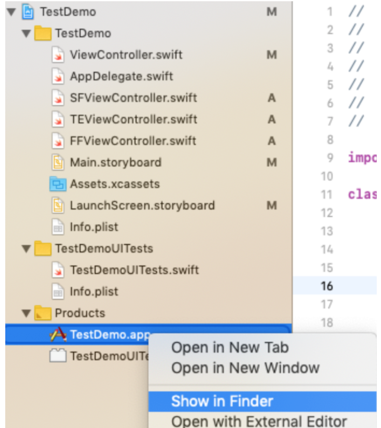
第 3 步:可以看到在 Products 文件夹同级补录下,有一个名为 Intermediates.noindex 的文件夹,依次进入 TestDemo.build -> Debug-iphoneos(或 Debug-iphonesimulator) -> TestDemo.build -> DerivedSources 文件夹下


第 4 步:当前文件下有一个名为 TestDemo-Swift.h 的文件,双击打开在该文件中查找 SFViewController,发现该类声明的上方有一句 SWIFT_CLASS("_TtC8TestDemo16SFViewController")

_TtC8TestDemo16SFViewController 即为原生界面 SFViewController.swift 转换后的类名, Web 页面配置如下:
推送 Web 页面配置如下:
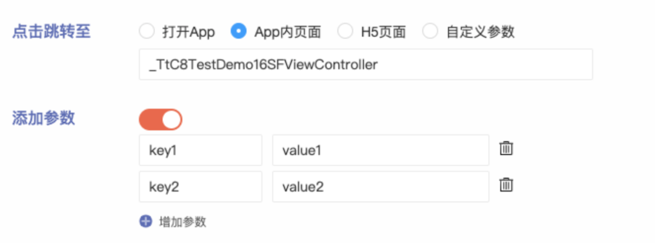
如何判断 iOS push 集成成功
1.扫码测试推送成功跳转对应页面,代表 GrowingPushKit 集成成功 2.创建图片测试推送,收到图片推送,代表 GrowingPushExtensionKit 集成成功
工程项目的推送设置以及证书配置
项目配置
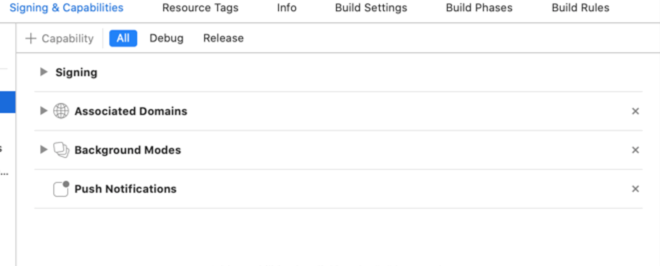
在项目工程中打开后台推送权限设置,如下图所示
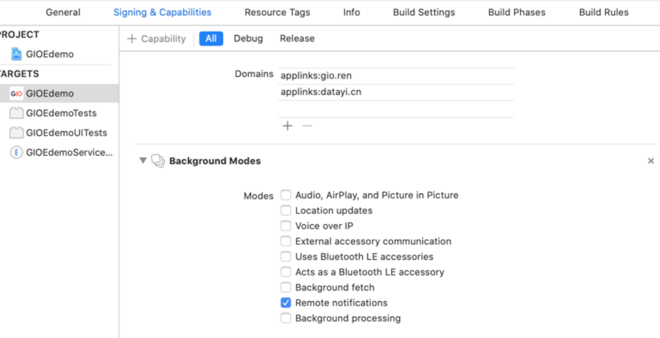
打开推送开关 Push Notifications,如下图所示
创建 App ID
如果之前已经创建了 App ID 可跳过这一步。
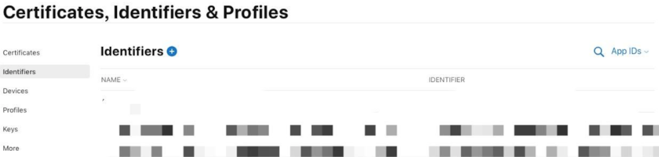
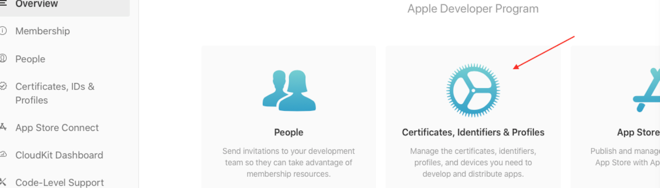
登录苹果开发者账号,点击如下图红色箭头区域,进入证书配置页面。

选中“Identifiers”,并且对应的是“App IDs”
选中对应的平台(Platform),输入对应的描述(Description)、Bundle ID
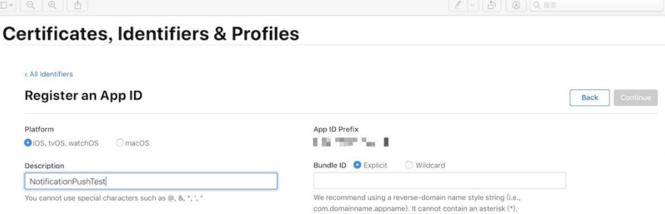
打开推送功能,选中如下图所示,点击右上角“continue”按钮,执行下一步

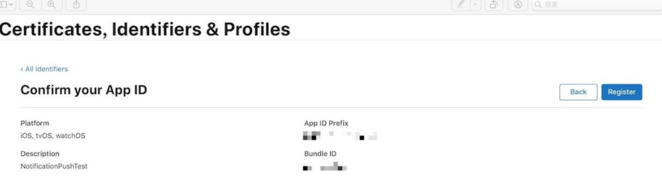
确定信息无误后,点击右上角“Register”进行注册
创建本地 CRS 证书
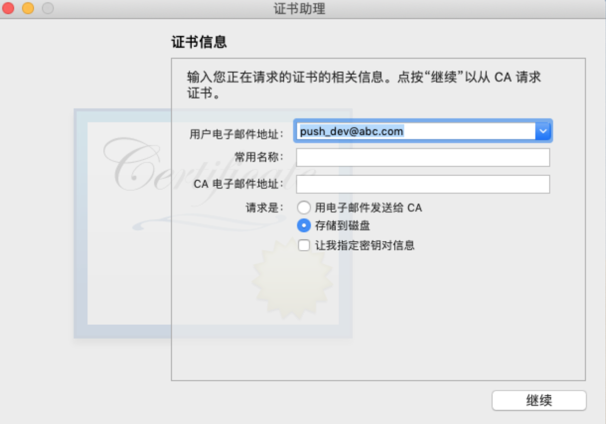
打开 MAC 电脑上的钥匙串访问,点击窗口左上角的“钥匙串访问”中的“证书助理”,选择“从证书颁发机构请求证书…”

将证书选择为“存储到磁盘”,输入任意合法的邮箱地址后即可将证书保存到本地目录路径下
创建推送证书
登录苹果开发者账号,点击下图红色箭头指示区域
点击加号“+”,创建证书

选择“Services”下创建推送证书,其中红色箭头指示的为创建开发调试环境下的推送证书,蓝色箭头指示的为创建生产环境以及开发调试下的推送证书,这里
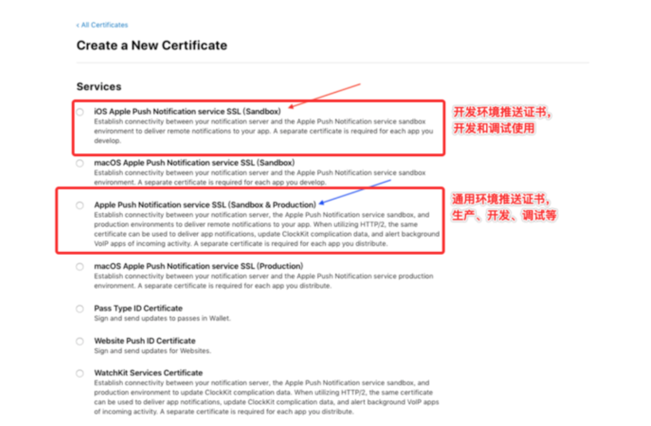
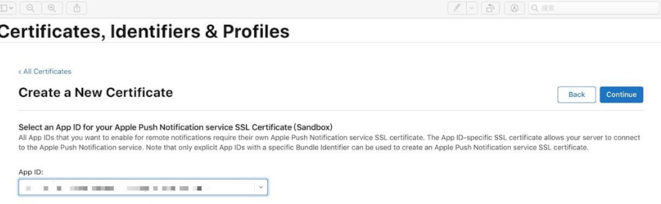
这里假如创建的是开发环境的推送证书,选中红色箭头对应的圆圈,点击右上角的“continue”按钮,进入下一步,选择项目对应的“App ID”,点击右上角的“continue”按钮,进入下一步
选择本地的“CRS”文件,点击右上角的“continue”按钮,进入下一步,即可生成对应项目开发环境下的推送证书,点击右上角的“Download”按钮,将证书下载到本地,选中刚才下载的证书,双击安装。
导出推送证书 p12
打开 MAC 电脑上的钥匙串访问,找到刚才安装的推送证书,选中右击导出该证书

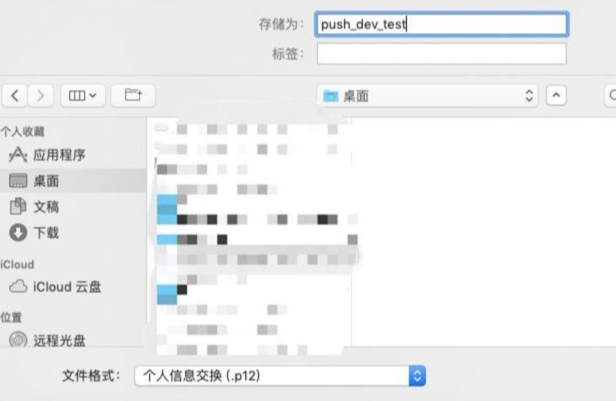
设置证书的本地存储路径,选择导出证书的格式为个人信息交换( .p12 ),设置证书密码
上传证书
登录网站, 确保已经成功集成了触达推送 SDK,在产品配置中的“应用配置”中
选择需要配置的推送证书的环境,输入对应的“BundleID”,选中本地导出的 p12 的推送证书,输入密码并保存。
推送有效性检测
如果在 GrowingIO 上测试推送时,无法收到推送消息时,请先按照如下几个步骤进行自行排查
1、工程配置,确保打开推送配置以及勾选远程推送 Remote notifications
2、通知授权注册并在 token 回调方法中调用 GIO 接口,上传 token 通知授权注册请求,一般在程序启动方法中请求
- (BOOL)application:(UIApplication *)application didFinishLaunchingWithOptions:(NSDictionary *)launchOptions {
// 通知授权注册请求方法,仅供参考
[self registerRemoteNotification];
return YES;
}
/\*\* 注册 APNs */
- (void)registerRemoteNotification {
if (@available(iOS 10,*)) {
UNUserNotificationCenter *center = [UNUserNotificationCenter currentNotificationCenter];
center.delegate = self;
[center requestAuthorizationWithOptions:(UNAuthorizationOptionAlert | UNAuthorizationOptionSound )
completionHandler:^(BOOL granted, NSError * _Nullable error) {
if (granted) {
dispatch_async(dispatch\_get\_main_queue(), ^{
[[UIApplication sharedApplication] registerForRemoteNotifications];
});
}
}];
} else if ([[UIApplication sharedApplication] respondsToSelector:@selector(registerUserNotificationSettings:)]) {
UIUserNotificationType type = UIUserNotificationTypeAlert | UIUserNotificationTypeBadge | UIUserNotificationTypeSound;
UIUserNotificationSettings *settings = [UIUserNotificationSettings settingsForTypes:type
categories:nil];
[[UIApplication sharedApplication] registerUserNotificationSettings:settings];
[[UIApplication sharedApplication] registerForRemoteNotifications];
}
}
在如下代理方法中将获取到的 token 上传到 GIO
/\*\* 远程通知注册成功委托 */
- (void)application:(UIApplication *)application didRegisterForRemoteNotificationsWithDeviceToken:(NSData *)deviceToken {
// 上传推送token
[GrowingTouch registerDeviceToken:deviceToken];
NSMutableString *deviceTokenString = [NSMutableString string];
const char *bytes = deviceToken.bytes;
NSInteger count = deviceToken.length;
for (NSInteger i = 0; i < count; i++) {
[deviceTokenString appendFormat:@"%02x", bytes[i] & 0xff];
}
NSLog(@"Token 字符串:%@", deviceTokenString);
}
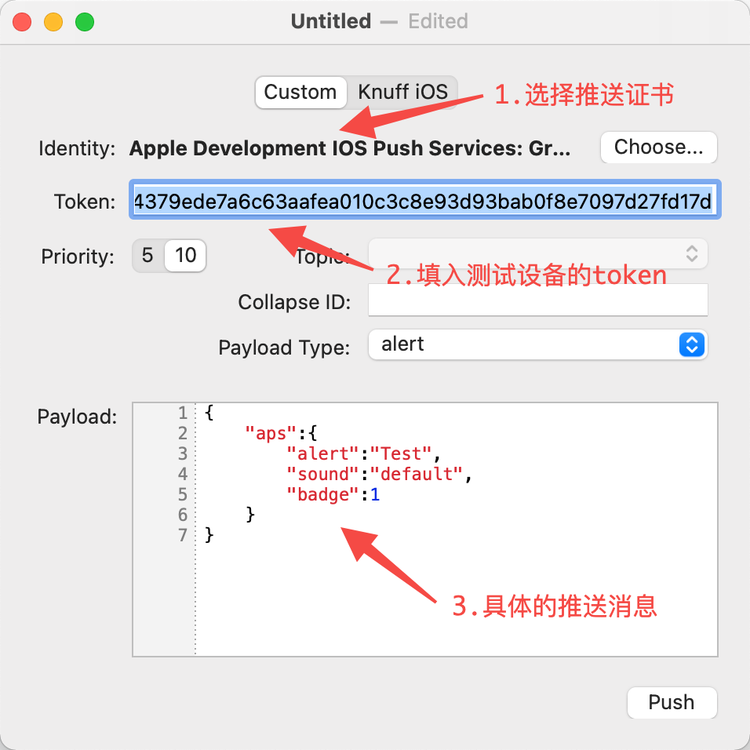
3、本地测试推送 下载推送工具(Knuff 等),导入相应的推送证书,填入上一步获取到的 token 进行本地推送,截图如下(这里以 Knuff 为例)
4、iOS 10 以后的图片推送送达检测 确保项目中添加了 ServiceExtension,类似如下图
ServiceExtension 的 NotificationService 类,在接收到推送的方法中调用 GIO 的 API
#import <GrowingCDPPushExtensionKit/GrowingPushExtensionKit.h>
- (void)didReceiveNotificationRequest:(UNNotificationRequest *)request withContentHandler:(void (^)(UNNotificationContent * _Nonnull))contentHandler {
self.contentHandler = contentHandler;
self.bestAttemptContent = [request.content mutableCopy];
[GrowingPushExtensionKit startWithAccountId:@"AccountId" dataSourceId:@"datasourceID "];
[GrowingPushExtensionKit setTrackerHost:@"your track host"];
[GrowingPushExtensionKit handleNotificationRequest:request
withCompletion:^(NSArray<UNNotificationAttachment *> * _Nullable attachments, NSArray<NSError *> * _Nullable errors) {
// Modify the notification content here...
self.bestAttemptContent.attachments = attachments; // 设置附件
self.contentHandler(self.bestAttemptContent);
}];
}
- 通过推送图片,确认收到图片推送即可
如果上述 1、2、3 步骤都正常,从网站上进行测试推送时,无法收到消息,请联系我们!
注意:
- App 集成 GIO 的推送 SDK,并发布到商店后,用户只有下载并打开了新版的 App 才可以上报推送令牌,这台设备才能够被送达。
- 分群是每日凌晨计算,所以如果用户 A 今天是第一次打开新版的 App,那么第二天才能进入分群被送达到。所以建议您第一次发送 Push 等待一天。