推送 SDK(iOS)
推送SDK最低兼容iOS 8.0 系统。
GrowingTouchCoreKit.framework触达基础依赖库 GrowingTouchCoreUI.bundle UI页面图 GrowingPushKit.framework 触达推送库 GrowingPushExtensionKit.framework 图片推送和iOS 10以上统计后台通知的到达率
GrowingPushKit 和 GrowingPushExtensionKit 都需要集成 !
GrowingPushKit 和 GrowingPushExtensionKit 都需要集成 !!
GrowingPushKit 和 GrowingPushExtensionKit 都需要集成 !!!且不同target
(1)使用CocoaPods快速集成
- 添加 pod 'GrowingTouch/GrowingPushKit' 以及pod'GrowingTouch/GrowingPushExtensionKit' 到 Podfile 文件中,特别需要注意的是要添加到不同的 TARGET 中,如下所示,GIOEdemo 是主工程的 TARGET,而 GIOEdemoServiceExtension 是扩展的 TARGET。
target 'GIOEdemo' do
pod 'GrowingTouch/GrowingPushKit'
end
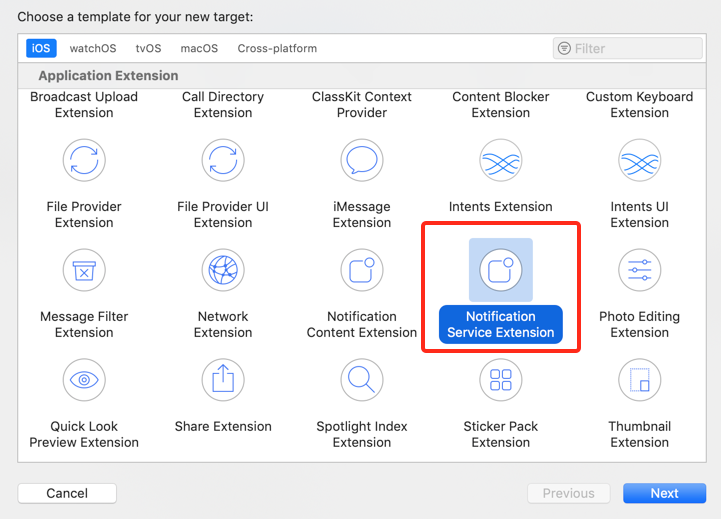
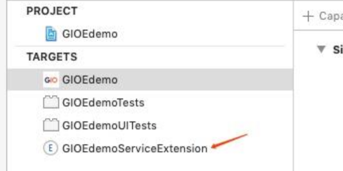
- 添加扩展 Notification Service Extension ,在 File -> New -> Target 中选择箭头所指,即可建立扩展GIOEdemoServiceExtension,
- 请将 Notification Service Extension 中的 Deployment Target 设置为 10.0。

pod 'GrowingTouch/GrowingPushExtensionKit' 到该扩展 TARGET 的Podfile 文件中,如下所示,GIOEdemo是主工程的 TARGET, GIOEdemoServiceExtension 是扩展的 TARGET,
target 'GIOEdemoServiceExtension' do
pod 'GrowingTouch/GrowingPushExtensionKit'
end
- 执行
pod update,不要用--no-repo-update选项 确保扩展GrowingPushExtensionKit引入成功,other link flags选项有添加$(inherited)和-ObjC
参考Podfile示例

(2)手动集成SDK
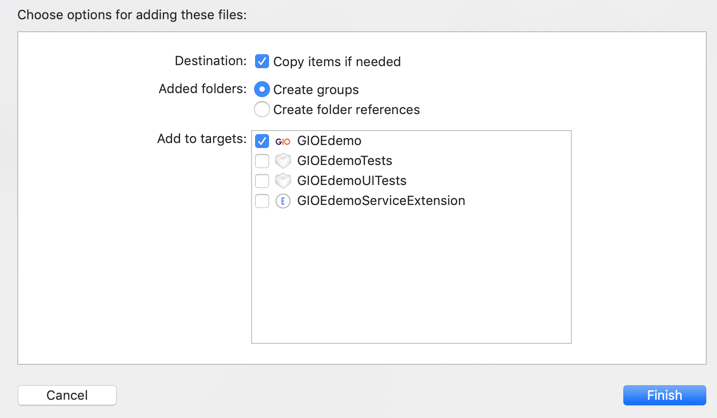
- 下载最新的iOS GrowingTouch SDK包,并将其中的GrowingTouchCoreKit.framework、GrowingTouchCoreUI.bundle以及GrowingPushKit.framework 添加到iOS工程中。下载链接:https://github.com/growingio/GrowingSDK-iOS-GrowingTouchCoreKit/archive/master.zip选项如下图所示。
- 添加扩展 Notification Service Extension ,在 File -> New -> Target 中选择箭头所指,即可建立扩展GIOEdemoServiceExtension,
- 请将 Notification Service Extension 中的 Deployment Target 设置为 10.0。
- 将其中的GrowingPushExtensionKit.framework包将之添到扩展Notification Service Extension 中, 选项如下图所示。下载链接:

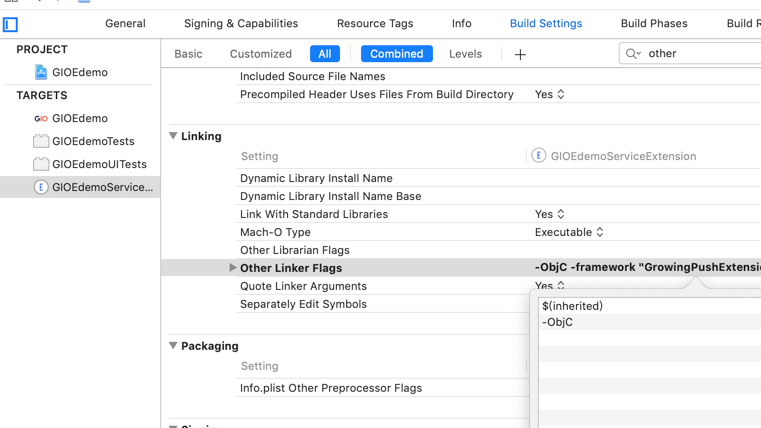
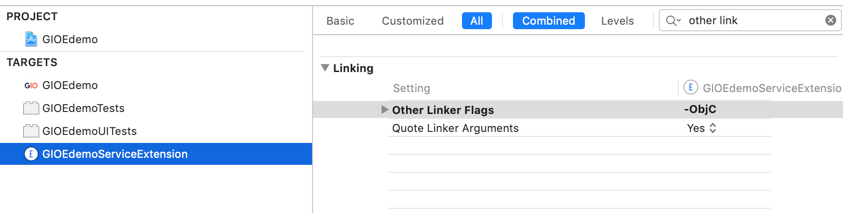
- 确保扩展GrowingPushExtensionKit引入成功,other link flags选项有添加
$(inherited)和-ObjC添加编译参数,并注意大小写:
请保证扩展的target 最低版本 iOS10.0

用户自行实现通知注册请求授权后,在 AppDelegate 的 deviceToken 代理方法中调用API,传入获取到的 deviceToken,请确保能获取 deviceToken,否则无法接收通知消息。
#import <UserNotifications/UserNotifications.h>
- (void)application:(UIApplication *)application didRegisterForRemoteNotificationsWithDeviceToken:(NSData *)deviceToken {
[GrowingTouch registerDeviceToken:deviceToken];
}
通知注册请求授权码可参考如下:
- (void)registerRemoteNotification {
if (@available(iOS 10,*)) {
UNUserNotificationCenter *center = [UNUserNotificationCenter currentNotificationCenter];
center.delegate = self;
[center requestAuthorizationWithOptions:(UNAuthorizationOptionAlert | UNAuthorizationOptionSound )
completionHandler:^(BOOL granted, NSError * _Nullable error) {
if (granted) {
dispatch_async(dispatch_get_main_queue(), ^{
[[UIApplication sharedApplication] registerForRemoteNotifications];
});
}
}];
} else if ([[UIApplication sharedApplication] respondsToSelector:@selector(registerUserNotificationSettings:)]) {
UIUserNotificationType type = UIUserNotificationTypeAlert | UIUserNotificationTypeBadge | UIUserNotificationTypeSound;
UIUserNotificationSettings *settings = [UIUserNotificationSettings settingsForTypes:type
categories:nil];
[[UIApplication sharedApplication] registerUserNotificationSettings:settings];
[[UIApplication sharedApplication] registerForRemoteNotifications];
}
}
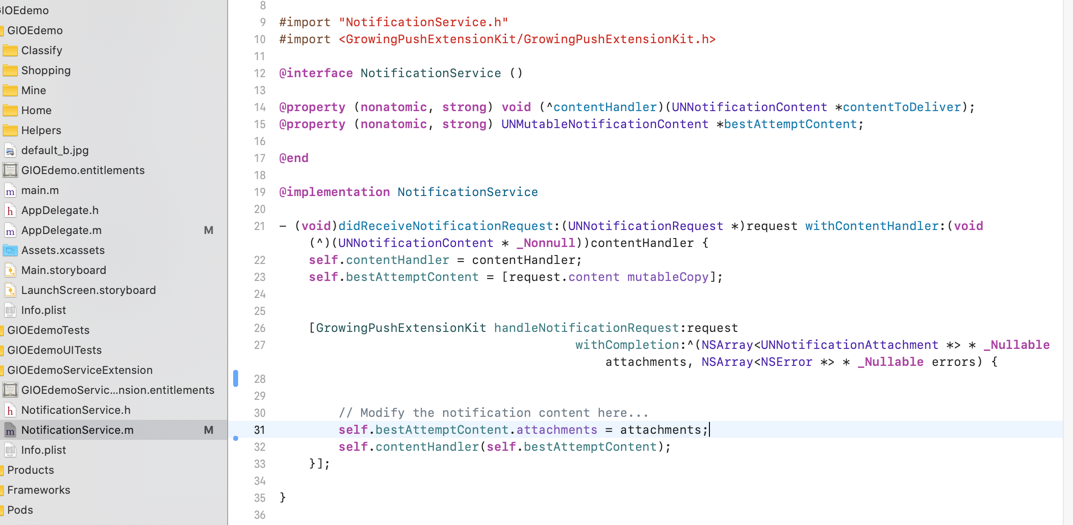
在 iOS10 提供的扩展 Notification Extension Service 中通知接收方法中调用通知消息回执接口,代码示例如下:(注意不是写在AppDelegate中,是写在你新建的扩展里面)
#import <GrowingPushExtensionKit/GrowingPushExtensionKit.h>
- (void)didReceiveNotificationRequest:(UNNotificationRequest *)request withContentHandler:(void (^)(UNNotificationContent * _Nonnull))contentHandler {
self.contentHandler = contentHandler;
self.bestAttemptContent = [request.content mutableCopy];
[GrowingPushExtensionKit handleNotificationRequest:request
withCompletion:^(NSArray<UNNotificationAttachment *> * _Nullable attachments, NSArray<NSError *> * _Nullable errors) {
// Modify the notification content here...
self.bestAttemptContent.attachments = attachments; // 设置附件
self.contentHandler(self.bestAttemptContent);
}];
}

推送功能默认提供打开APP、打开网页、打开APP内部页面三种功能,如果该三种功能还是满足不了您的需求,您可以在SDK提供的以下方法回调中自定义自己的跳转逻辑。
// 点击消息跳转用户自定义
+ (void)clickMessageWithCompletionHandler:(void (^)(NSDictionary *params))completionHandler;
由于iOS的远程推送通知在各个版本上有一定的改动,为了统计数据更加准确,需要针对不同的系统分别做相应的处理
针对 Remote Notifications 系统提供了以下2个通知接收方法,如果您的应用支持iOS 10 以下的系统,请至少实现如下2个方法中的任意一个,建议实现方法2
// 1、早期的方法,iOS 10 以后废弃,依然可以使用
- (void)application:(UIApplication *)application didReceiveRemoteNotification:(NSDictionary *)userInfo NS_DEPRECATED_IOS(3_0, 10_0);
// 2、上述方法的替代方法
- (void)application:(UIApplication *)application didReceiveRemoteNotification:(NSDictionary *)userInfo fetchCompletionHandler:(void (^)(UIBackgroundFetchResult result))completionHandler NS_AVAILABLE_IOS(7_0);
对于iOS 10 及以上的系统,请通过 UNUserNotificationCenter 请求通知授权并设置代理,并同时实现如下2个通知代理接收方法
- (void)userNotificationCenter:(UNUserNotificationCenter *)center willPresentNotification:(UNNotification *)notification withCompletionHandler:(void (^)(UNNotificationPresentationOptions options))completionHandler;
- (void)userNotificationCenter:(UNUserNotificationCenter *)center didReceiveNotificationResponse:(UNNotificationResponse *)response withCompletionHandler:(void(^)(void))completionHandler ;
针对 iOS 10.0 以上的系统,为了能支持图片推送和统计后台通知的到达率,可添加 Notification Service Extension 类型的 target ,调用指定的 API,具体参见“重要配置”中的第2条,在当前项目中添加 Notification Service Extension 步骤如下:
在 File -> New -> Target 中选择箭头所指,即可建立
特别需要注意以下两点:
(1)如果点击跳转的原生界面是通过Objective-C开发的控制器,例如控制器名称为 InAppViewController ,传递参数为key1、key2,则推送Web 页面配置如下:
- 推送Web页面配置如下:

此时生成的跳转链接为
InAppViewController?key1=value1&key2=value2 ,点击自动跳转到原生界面InAppViewController,并携带两个参数。在InAppViewController可以通过提前定义属性,获取参数
@interface InAppViewController : UIViewController
@property (nonatomic, copy) NSString *key1;
@property (nonatomic, copy) NSString *key2;
@end
(2)如果跳转的原生界面是通过swift开发的控制器,需要按照以下步骤进行接入。
例如跳转的原生界面是SFViewController.swift,示例项目工程为 TestDemo,在SFViewController.swift中可以通过提前定义属性,用于获取参数
class SFViewController: UIViewController {
@objc var key1: String?
@objc var key2: String?
override func viewDidLoad() {
super.viewDidLoad()
// Do any additional setup after loading the view.
}
}
第1步:编译运行当前示例项目工程TestDemo(实际过程中应为对应的项目工程名称)

第2步:运行成功之后,在Products文件夹下,选中 TestDemo.app 后 Show in Finder
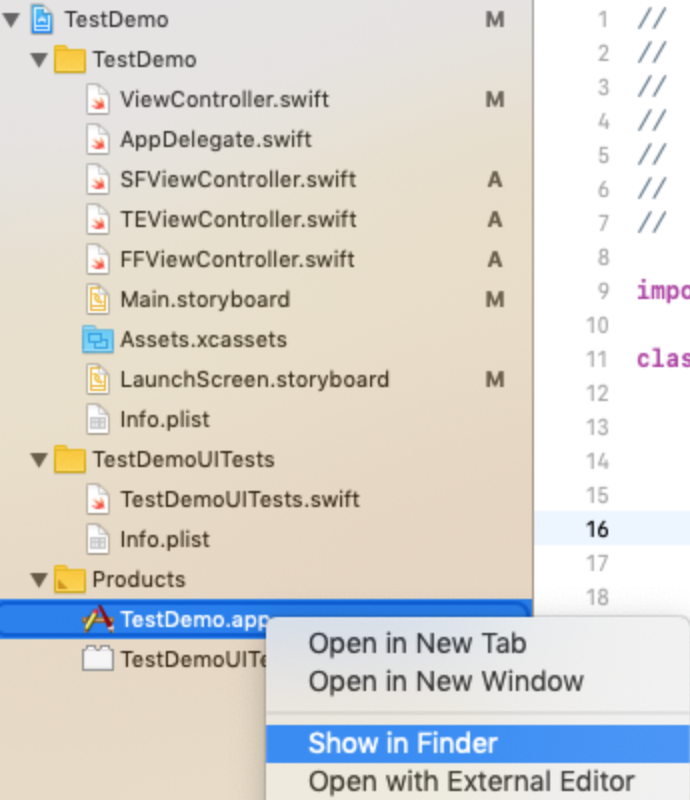
第3步:可以看到在Products文件夹同级补录下,有一个名为Intermediates.noindex 的文件夹,依次进入 TestDemo.build -> Debug-iphoneos(或Debug-iphonesimulator) -> TestDemo.build -> DerivedSources 文件夹下


第4步:当前文件下有一个名为 TestDemo-Swift.h 的文件,双击打开在该文件中查找 SFViewController,发现该类声明的上方有一句 SWIFT_CLASS("_TtC8TestDemo16SFViewController")

_TtC8TestDemo16SFViewController 即为原生界面SFViewController.swift转换后的类名, Web 页面配置如下:
推送Web页面配置如下:

1.扫码测试推送成功跳转对应页面,代表GrowingPushKit集成成功
2.创建图片测试推送,收到图片推送,代表GrowingPushExtensionKit集成成功
在项目工程中打开后台推送权限设置,如下图所示

打开推送开关Push Notifications,如下图所示

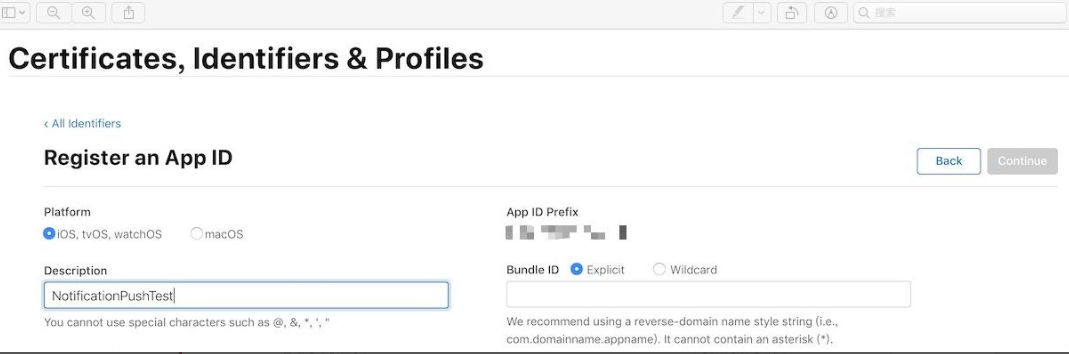
如果之前已经创建了App ID可跳过这一步。
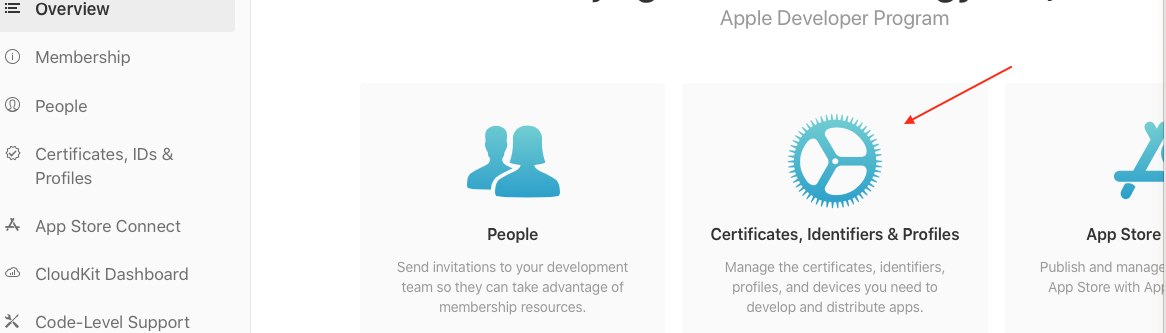
登录苹果开发者账号,点击如下图红色箭头区域,进入证书配置页面。

选中“Identifiers”,并且对应的是“App IDs”

选中对应的平台(Platform),输入对应的描述(Description)、Bundle ID
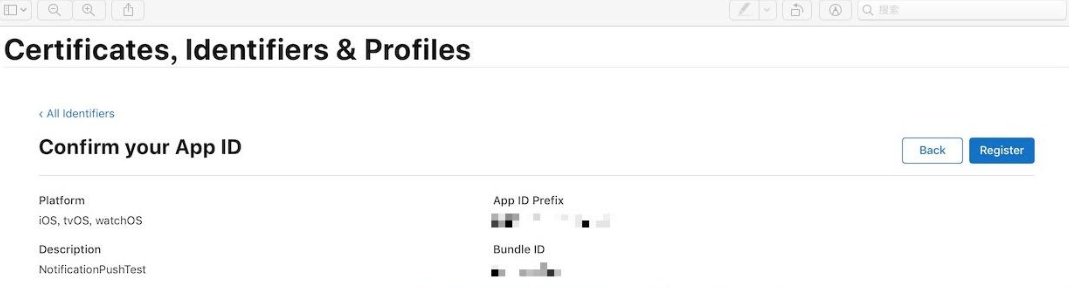
打开推送功能,选中如下图所示,点击右上角“continue”按钮,执行下一步

确定信息无误后,点击右上角“Register”进行注册
打开MAC电脑上的钥匙串访问,点击窗口左上角的“钥匙串访问”中的“证书助理”,选择“从证书颁发机构请求证书…”

将证书选择为“存储到磁盘”,输入任意合法的邮箱地址后即可将证书保存到本地目录路径下

登录苹果开发者账号,点击下图红色箭头指示区域
点击加号“+”,创建证书

选择“Services”下创建推送证书,其中红色箭头指示的为创建开发调试环境下的推送证书,蓝色箭头指示的为创建生产环境以及开发调试下的推送证书,这里

这里假如创建的是开发环境的推送证书,选中红色箭头对应的圆圈,点击右上角的“continue”按钮,进入下一步,选择项目对应的“App ID”,点击右上角的“continue”按钮,进入下一步

选择本地的“CRS”文件,点击右上角的“continue”按钮,进入下一步,即可生成对应项目开发环境下的推送证书,点击右上角的“Download”按钮,将证书下载到本地,选中刚才下载的证书,双击安装。
打开MAC电脑上的钥匙串访问,找到刚才安装的推送证书,选中右击导出该证书

设置证书的本地存储路径,选择导出证书的格式为个人信息交换( .p12 ),设置证书密码

登录“GrowingIO”网站,找到对应配置的项目,确保之前已经成功集成了触达SDK,在产品配置中的“应用配置”中

选择需要配置的推送证书的环境,输入对应的“BundleID”,选中本地导出的p12的推送证书,输入密码并保存。
如果在GrowingIO上测试推送时,无法收到推送消息时,请先按照如下几个步骤进行自行排查
1、工程配置,按照下图确保打开推送配置以及勾选远程推送 Remote notifications

2、通知授权注册并在token回调方法中调用GIO接口,上传token
通知授权注册请求,一般在程序启动方法中请求
- (BOOL)application:(UIApplication *)application didFinishLaunchingWithOptions:(NSDictionary *)launchOptions {
// 通知授权注册请求方法,仅供参考
[self registerRemoteNotification];
return YES;
}
/** 注册 APNs */
- (void)registerRemoteNotification {
if (@available(iOS 10,*)) {
UNUserNotificationCenter *center = [UNUserNotificationCenter currentNotificationCenter];
center.delegate = self;
[center requestAuthorizationWithOptions:(UNAuthorizationOptionAlert | UNAuthorizationOptionSound )
completionHandler:^(BOOL granted, NSError * _Nullable error) {
if (granted) {
dispatch_async(dispatch_get_main_queue(), ^{
[[UIApplication sharedApplication] registerForRemoteNotifications];
});
}
}];
} else if ([[UIApplication sharedApplication] respondsToSelector:@selector(registerUserNotificationSettings:)]) {
UIUserNotificationType type = UIUserNotificationTypeAlert | UIUserNotificationTypeBadge | UIUserNotificationTypeSound;
UIUserNotificationSettings *settings = [UIUserNotificationSettings settingsForTypes:type
categories:nil];
[[UIApplication sharedApplication] registerUserNotificationSettings:settings];
[[UIApplication sharedApplication] registerForRemoteNotifications];
}
}
在如下代理方法中将获取到的token上传到GIO
/** 远程通知注册成功委托 */
- (void)application:(UIApplication *)application didRegisterForRemoteNotificationsWithDeviceToken:(NSData *)deviceToken {
// 上传推送token
[GrowingTouch registerDeviceToken:deviceToken];
NSMutableString *deviceTokenString = [NSMutableString string];
const char *bytes = deviceToken.bytes;
NSInteger count = deviceToken.length;
for (NSInteger i = 0; i < count; i++) {
[deviceTokenString appendFormat:@"%02x", bytes[i] & 0xff];
}
NSLog(@"Token 字符串:%@", deviceTokenString);
}

4、iOS 10 以后的图片推送送达检测
确保项目中添加了ServiceExtension,类似如下图
ServiceExtension的NotificationService类,在接收到推送的方法中调用GIO的API
- (void)didReceiveNotificationRequest:(UNNotificationRequest *)request withContentHandler:(void (^)(UNNotificationContent * _Nonnull))contentHandler {
self.contentHandler = contentHandler;
self.bestAttemptContent = [request.content mutableCopy];
// 仅供参考
[GrowingPushExtensionKit handleNotificationRequest:request
withCompletion:^(NSArray<UNNotificationAttachment *> * _Nullable attachments, NSArray<NSError *> * _Nullable errors) {
// Modify the notification content here...
self.bestAttemptContent.attachments = attachments; // 设置附件
// self.bestAttemptContent.title = [NSString stringWithFormat:@"%@ [PushExtensionKit集成成功]", self.bestAttemptContent.title];
self.contentHandler(self.bestAttemptContent);
}];
}
- 通过推送图片,确认收到图片推送即可
如果上述1、2、3步骤都正常,从GrowingIO官网进行测试推送时,无法收到消息,请联系我们!
注意:
- App集成GIO的推送SDK,并发布到商店后,用户只有下载并打开了新版的App才可以上报推送令牌,这台设备才能够被送达。
- 分群是每日凌晨计算,所以如果用户A今天是第一次打开新版的App,那么第二天才能进入分群被送达到。所以建议您第一次发送 Push 等待一天。
Last modified 1yr ago